Tag: Dynamics Community

  • Connect to External File Accounts

    Managing document storage effectively becomes a key part of optimizing performance and scalability when an organization adopts cloud-based ERP systems. Dynamics 365 Business Central offers External File Storage options to help businesses move large or non-essential documents out of the core database and into cost-effective external systems.

    Some of the main benefits to use an External File Storage in Business Central are listed below.

    1. 🚀 Improved System Performance

    • Problem: Storing large files (e.g., PDFs, images, documents) directly in the Business Central database bloats it.
    • Impact: Slower performance during backups, longer load times, and reduced responsiveness.
    • Solution: External storage offloads the bulk, keeping Business Central fast and responsive.

    2. 💾 Reduced Database Size & Cost

    • Business Central environments (especially SaaS) have storage limits and costs tied to database usage.
    • By moving large files out of the core database:
      • You lower storage usage
      • Avoid extra charges from Microsoft for exceeding data capacity

    3. 🔐 Better Security & Compliance

    • External systems support:
      • Role-based access
      • Retention policies
      • Audit trails
      • Data encryption

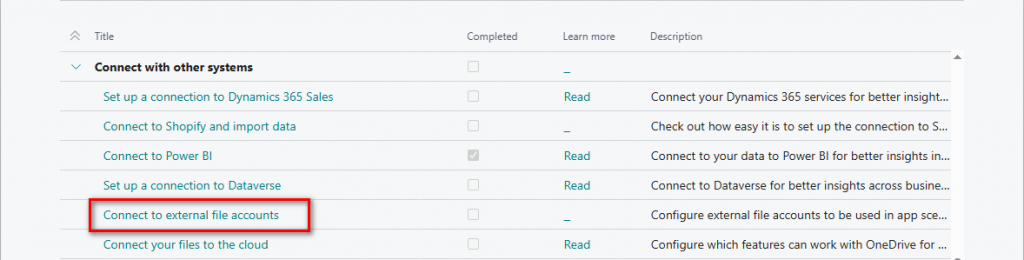
    Follow the steps below to link your file storage to Business Central.

    First, search for Assisted Setup.

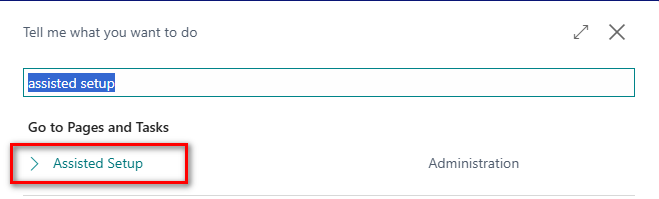
    Then select the option highlighted below within the Connect with other systems section.

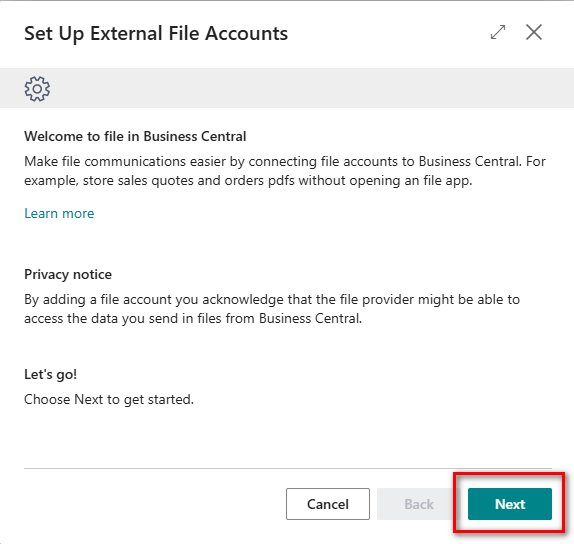
    Walk through the wizard to complete the setup.

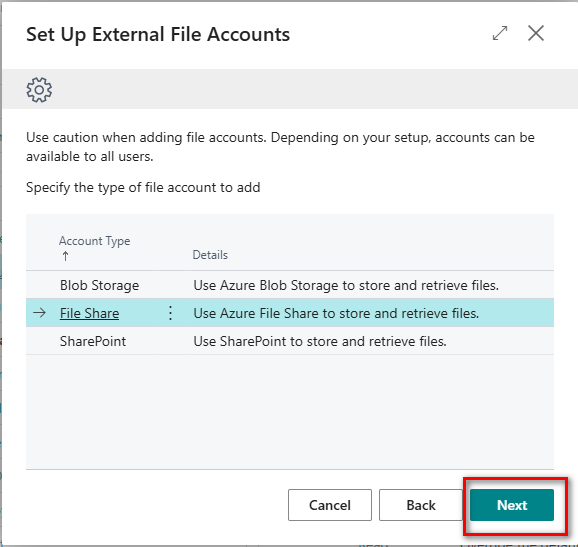
    Select the file account to add, in this example File Share will be used.

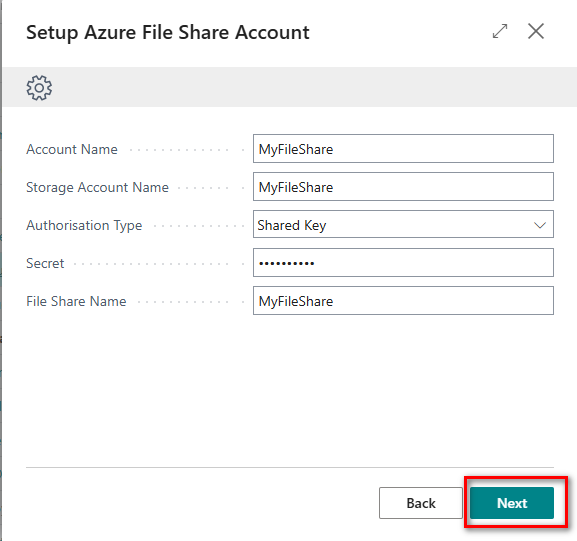
    Enter the relevant details relating to your file share.

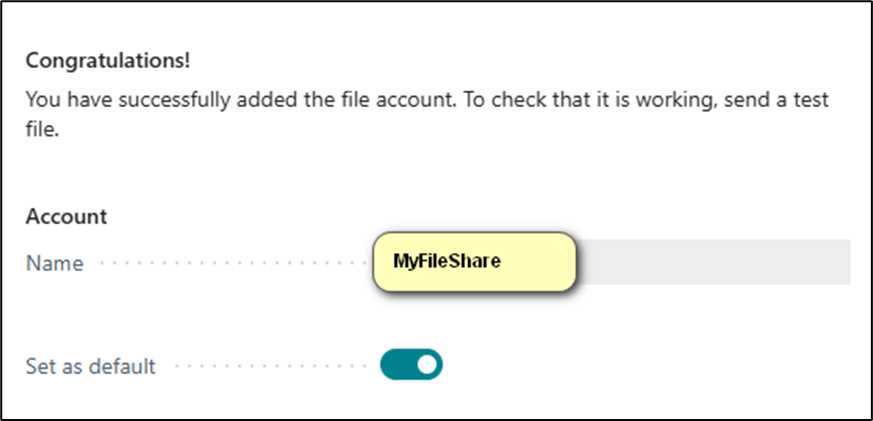
    The connection should now be established and you have the option to set as default.

    N.B. When setting up a BLOB storage then the following details are required.

    • Account Name
    • Storage Account Name
    • Authorisation Type
    • Secret
    • Container Name

    When connecting to Sharepoint account then the below details are required.

    • Account Name
    • Tenant Id
    • Client Id
    • Client Secret
    • Sharepoint Name
    • Base Relevant Folder Path

    With the setup complete this will allow for easier integration and automation:

    • External files are easier to:
      • Access via APIs or Power Automate
      • Share with external partners

    Thanks, Shauna

  • Reminder Letters – Automation

    In Microsoft Dynamics 365 Business Central, Reminder Letters are used to notify customers about overdue invoices. This is part of the Credit and Collections process to help improve cash flow and maintain customer accountability. The main purpose of Reminder Letters are to

    1. Encourage prompt payments.

    2. Alert customers about overdue payments.

    3. Apply reminder fees or interest (optional).

    Starting in version 26, Business Central allows you to automatically create, issue, and send reminder letters based on predefined conditions. This feature reduces workload and ensures customers are notified promptly about overdue invoices.

    Key Enhancements in v26

    FeatureDescription
    Automatic CreationBusiness Central can now automatically create reminders based on a schedule or event trigger.
    Automatic IssuingThe reminders can be auto-posted and sent without manual review (optional setting).
    Job Queue IntegrationUses job queues to schedule and run reminder generation and sending processes.
    Enhanced LoggingLogs actions for audit trail and error troubleshooting.
    Conditions ConfigurationYou can set up rules for when to generate and send reminders (e.g., days overdue, customer filters).

    How does it work? A new set of stacks have been added to the Accounts Receivables Administrator profile. This allows quick access to the configured automations or else search for “Reminders Automation”.

    Click on New and enter the details as below. The Reminder Terms filter allows you to determine which reminders should be created using this automation.

    Setup the schedule required. For Weekly or Monthly enter a start date for this process to commence. Custom schedule will allow a Next Run Date formula to be entered.

    Then click on New in the Actions section.

    Enter the Reminder Code and select “Create Reminders” followed by ok.

    Then choose whichever additional filters required.  I have selected the filter to only show the overdue entries.

    Then click on Start.

    This will create a job queue entry (if setup to run automatically) running the “Reminders Automation Job” codeunit.

    When the job has run successfully there should be Reminders created for any customers with overdue balances. N.B. This will depend on the basic reminder setup already complete. Microsoft Learn link provided. Set Up Reminder Terms and Levels – Business Central | Microsoft Learn

    Now create another reminder automation to issue the reminders. Setup the details as shown in the below example.

    Again, click on New within the Actions and here you can add any additional parameters to replace Posting/VAT date or filter on Reminder Terms.

    Once complete a second job queue will be created.

    Once this job has been completed the reminders will have been issued and can now be viewed within the Issued Reminders page.

    The final automation will then email the reminders that have just been issued.

    Repeat the same process as above.

    The new Action will be as follows

    Then choose any filters that may be required, I choose to send the overdue invoices as well as the reminder letter.

    Then confirm by choosing Start which will create the third job queue entry.

    Here are the 4 emails sent.

    Choosing one of the emails shows all the attachments, i.e. one reminder letter and 7 attachments for the 7 overdue invoices.

    Along with the email body of the outstanding transactions.

    The automated reminder functionality in Business Central v26 is one of those features that delivers immediate value with minimal effort. It not only streamlines accounts receivable but also ensures:

    Reduced errors compared to manual processing

    💼 Consistency in following up with customers

    ⏱️ Time savings for finance teams

    📈 Improved cash flow through timely reminders

    Thanks, Shauna

  • Related Tables in Analysis Mode

    Many of you will be familiar with the analysis mode within Business Central and many will have used this feature to interactively analyse data directly within the list pages.

    The key features of Analysis Mode were

    • Pivot and Slice – Pivot tables on-the-fly to view data from different perspectives.
    • Aggregate functions – Group by fields (e.g., customer, item category) and apply dynamic filters.
    • Group and Filter – Group by fields (e.g., customer, item category) and apply dynamic filters.
    • Drag-and-drop fields – Customize views by dragging columns to rows, columns, or value sections.
    • Save views – Save personal or shared analysis views for quick access.
    • No export required – Analyze within Business Central—eliminates the need to export to Excel.

    While this was a feature that allowed users to report on the data themselves in a more flexible fashion there was still the issue with the limited scope of data.

    Now with the ability to add information from related tables the scope of data to analyse has been increased. So, how does it work?

    From the analysis page click on the down arrow and select the Add Columns From option.

    This is a list of the tables that columns can be added from and it also shows how this tables are linked. For example, the Dimension Value Code is linked using either Dimension 1 Code or Dimension 2 Code from the customer ledger entries.

    However, let’s proceed with this example and select the customer and from this you will then be presented with the fields from the customer card.

    Select one or more columns to add as below and then ok.

    Click on the confirmation and note that this will always appear when you enter analysis mode from within the customer ledger entries.

    The columns will be added at the end of the list but also to the columns section allowing you to group on these new related fields.

    If you have had any customisations around additional fields added to the customer ledger entry then any with a table relation can be added unto this analysis.

    You can also add columns by selecting the ‘hamburger’ symbol to the right of the column name. Any columns added via this method will be inserted as new columns to the right.

    Select Currency and add the field currency factor.

    Another option available to use Other Source when selecting the option Add columns from. In this example, Item Category Code is a field available on the Item Ledger Entries but it isn’t an option that is already defined.

    Once you select Other source then enter the details as follows:

    Enter the table that you want to add as a link and then select the field that you would like to include. In this instance it will be table Item Category and field Description.

    Once again the field has been added to the end and is also available as a column to group by.

    This has certainly enhanced the analysis feature within Business Central and should make a positive impact on the users to allow for even more flexible data analysis.

    Thanks, Shauna

  • Reconcile Customer Payments

    Register Customer Payments is a solid option in Business Central that’s often overlooked, especially when people default to the Cash Receipt Journal or Payment Reconciliation Journal. It’s more user-friendly and visual, designed for quickly applying payments to open invoices—kind of like a simplified payment posting screen.

    After customers make electronic payments to your bank account, you must take the following actions:

    • Apply each paid amount to the related sales document.
    • Post the payment to update the customer, general ledger, and bank ledger entries.

    Depending on your business needs, you can register payments manually, automatically, and through payment services.

    Use the Register Customer Payments page to balance internal accounts by using actual cash figures to ensure that payments are collected. Quickly verify and post individual or lump-sum payments, process discounted payments, and find the unpaid documents.

    You must post payments for different customers that have different payment dates as individual payments. Payments for the same customer that have the same payment date can be posted as a lump-sum payment. Lump-sum payments are useful, for example, when a customer made a single payment that covers multiple sales invoices.

    Complete the Payment Registration Setup by using the Tell Me to find the page.

    or select the Setup from the Register Customer Payments page.

    N.B. This page can also be accessed via the customer list which then filters the unpaid transactions to that customer.

    Let’s focus on Trey Research as our first example and this is where the payments will be posted individually. Here we have three transactions that have yet to be paid.

    If the full amount has been paid then tick Payment Made. The Date Received will default to the workdate as we asked for this in the setup above.

    Date Received can be overtyped or you can untick this field within the Setup and manually enter the date.

    The second invoice will only be part paid so the amount received has been overtyped.

    There are two options available on how you want to post these payments.

    Post Payments will create individual bank ledger entries for each payment whereas Post as Lump Payment will create one bank ledger entry. Use the Preview Posting to confirm these transactions.

    or as a lump payment

    Post individually for this example. Then move unto the next payment.

    In this example there is a document that has not yet been invoiced so therefore not available to select for payment

    Use the Search and Search Documents.

    Enter the document number and then select Search.

    Now we can show the document and post.

    Returning back to the Register Customer Payments screen to refresh the details will now show the invoice that was just posted.

    Now continue with the steps above the mark the appropriate entries as paid.

    So, what would happen if you receive a payment that does not relate to a document? Using the same customer select the General journal from within Actions.

    Some of the details will be defaulted from the Regsiter Customer Payments along with the Balance Account details.

    Just set the remaining fields to the correct values and then post.

    At first glance I can definitely see the benefit of using this option rather than the usual Cash Receipt Journals and it is one that I will defintely demo in the future.

    In my next post I will take this further and investigate how to handle discount that should be applied based on the customer payment terms.

    Thanks, Shauna

  • Exchange Rate Service

    The exchange rate service in Business Central allows you to automatically update currency exchange rates from a third-party provider (like FloatRates, ECB, or custom ones). This is super useful for companies dealing with multiple currencies.

    🧭 Common Use Cases:

    • Automatically updating currency exchange rates daily.
    • Reducing manual entry errors for currency values.
    • Ensuring accurate foreign currency valuations for transactions, reporting, and revaluations.

    Floatrates will be used in this example so if anyone can make use of this then please follow the steps outlined below.

    Click on New and enter the details highlighted below.

    The Service URL is http://www.floatrates.com/daily/gbp.xml.

    The field mapping should be filled in as below but drill into the Source to select the entry for each field.

    Once all the details have been entered then the service can be enabled.

    Accept the terms and conditions

    Then create the job queue entry which will default to a daily update of the exchange rate.

    N.B. You can change the frequency using the Next Run Date Formula if required.

    Filter on the current date after the job queue has completed and there will be records created for each of the exchange rates. See sample below.

    If you wanted to change the value of the Fix Exchange Rate Amount then modify the exchange service. Firstly, deselect the Enable field so that changes can be made.

    Add another row into the field mapping and drill into the next blank caption field to select Fix Exchange Rate Amount.

    Set the Default Value as Relational Currency or Both. Then enable the service to complete.

    Thanks, Shauna

  • Check Document Totals

    ​In Dynamics 365 Business Central, document totals are automatically calculated and displayed beneath the line items on sales and purchase documents. These totals include amounts such as Subtotal Excluding VAT, Total, VAT Total, and Total Including VAT, and they update dynamically as you create or modify lines.

    Purchase Invoice Lines will total as shown below.

    To ensure accuracy when posting purchase documents, Business Central checks whether the Amount Including VAT and the VAT Amount stated on the purchase document match the total amounts of the purchase lines. If discrepancies are detected, you’ll be notified during the posting process. This feature can be activated by selecting “Check Doc. Total Amounts” in the Purchases & Payables Setup.

    Once this field is activated then the two new fields on the header must be entered otherwise you will get an error when posting.

    Enter the Doc. Amount Incl VAT and the Doc. Amount VAT should be automatically calculated.

    When the totals match then the purchase document can be posted. This feature is available from v26/2025 wave 1 and the check totals will be activated for purchase invoices and purchase credits.

    Another great feature coming in the upcoming release.

    Thanks, Shauna

  • Reopen Production Orders

    This is a major upgrade! Being able to reopen finished production orders in Business Central v26 will give users much more flexibility in handling adjustments and corrections. How does it work?

    From the finished production order page there is a new Action to reopen.

    Confirm to reopen the order, i.e. change back to released status.

    Then confirm to open the production order.

    Now any issues with the production order can be resolved before completing.

    Points to note are that,

    1. A finished production order can only be reopened ONCE.
    2. There is no ability to reopen more than one finished production order at a time, individual orders only.
    3. There must be output posted against the finished production order.

    Another great addition to manufacturing and one that will enhance the user experience.

    Thanks, Shauna

  • Cancel Production Orders

    This sounds like a game-changer! Being able to cancel a production order even after transactions have been posted must make things so much more flexible and reduce a lot of manual work. Have you had a chance to test it out yet? How’s it working in practice? Let’s take a look below.

    Here is an example production order, still with released status where some consumption and output have been posted. Looking at these entries within the item ledger entries.

    Within the Actions, functions menu there is a new option to Reverse Production Order Transaction.

    For item ledger entries of the type Consumption, the action creates item journal lines of the type Consumption. For the item journal lines, it copies values from the original transaction, uses the opposite sign in the Quantity field, applies to the original entry, and posts the item journal.

    Once the reversing entry has been posted another item ledger entry will be created which is applied to the entry just reversed.

    Can we reverse more than one entry? Select the other two consumption entries as below and then try to reverse.

    Afterwards there are an additional two ledger entries created.

    *** All the reversal entries will use the original posting date ***

    Looking back at the released production order the component lines are now sitting as they were originally before any postings happened.

    Now try to reverse the output, in this example there are 2 output entries with different posting dates.

    Entries have been successfully reversed and posted with the corresponding dates.

    Looking back at the released production order again and the production order line is sitting at it’s original state.

    N.B. If you are using routings then it also removes the Finished status from the related production routing line.

    Important points to remember are that the action isn’t supported under the following conditions:

    • If the output entry was already applied to an outbound transaction.
    • If consumption/output involves warehouse handling. Bins are supported.
    • Entries were created through subcontracting purchase orders. You can undo receipt in the Posted Purchase Receipt page.

    You can undo subcontracting receipts before you post them as invoiced. To do this, go to the posted purchase receipt, select the line, and choose the Undo action. As a result, an identical line with an opposite sign in the Quantity is created along with the capacity ledger entry. And, if the canceled receipt line is linked to the last routing operation, the item ledger entry of the type Output. You can’t reverse a receipt if it was invoiced or if the production order was finished.

    The final step is the process is to change the status of the production order to Finished. In order to do this, switch on the new toggle in the manufacturing setup.

    Confirm the following message.

    Now when trying to change the status of the released production order you must the new toggle to finish Order.

    Another contentious issue with production orders was the inability to finish a production order when there were only consumption entries posted. Previously there would always have to be an output quantity before the production order could be finished. This is now resolved with the new toggle on the manufacturing setup as mentioned above. Finally!!

    The accumulated WIP amounts are posted to your inventory adjustment account. Remember to fill in the Inventory Adjustment Account on the General Posting Setup page for the entry defined by:

    The Gen. Prod. Posting Group field on the produced item.

    The Gen. Bus. Posting Group field on the production order.

    As a first pass this new feature will be an absolute game changer. Just need to perform a few more tests i.e. Lot No’s, Serial No’s etc but absolutely oustanding feature Microsoft. Well done!

    Thanks, Shauna

  • Drag & Drop

    The drag-and-drop feature in Microsoft Dynamics 365 Business Central has been enhanced to allow users to attach multiple files simultaneously, streamlining document management processes.

    Key Enhancements:

    • Multi-File Uploads: Users can now select and drag multiple files into the file upload dialog to attach them to records, eliminating the need to upload each file individually.
    • Expanded Functionality Across Pages: This feature is available on various pages, including:
      • Document Attachments List FactBox: Accessible on many document pages within the Attachments section of the FactBox pane.
      • Incoming Document Files FactBox: Found on pages related to incoming documents, facilitating efficient processing of received files.
      • Email Editor: Users can attach one or more files when drafting emails directly within Business Central.

    Here is a short video as a visual demonstration of this feature.

    Drag & Drop Multiple files and Folders

  • Welcome to My Blog!

    After months of planning, I’m excited to finally launch this blog—a space dedicated to sharing valuable insights, tips, and tutorials for Business Central users.

    I’m also thrilled to announce that I’ve been recognized as a Super User in the Dynamics Community for the second year in a row! It’s an honor to be part of such a knowledgeable and supportive network.

    This site will serve as a growing resource filled with videos, tutorials, and practical advice to help you navigate Business Central more effectively. As I continue to build out the content library, you can expect:

    • Updates on new features and functionality
    • Solutions to common challenges and issues that arise with new releases
    • Practical how-to guides for users at all levels

    If you have any questions or need help with Business Central, feel free to reach out via the contact form—I’d love to hear from you!

    Stay tuned for more content, and thanks for joining me on this journey.

    Shauna